Metroスタイルアプリケーションでスタート画面のタイルに画像を表示する方法を紹介します。
準備
タイルに表示させる画像と、アプリケーションのタイル画像を準備します。
アプリケーションのタイル画像
アプリケーションタイル画像 (通常タイル用)
150×150 Pixelの画像を用意します。今回は下図の画像を用います。

アプリケーションタイル画像 (通常タイル用)
310×150 Pixelの画像を用意します。今回は下図の画像を用います。

作成したタイル画像はMetroアプリケーションのプロジェクトのAssetsディレクトリに配置します。配置後"Package.appxmanifest"ファイルを編集し、タイル画像を作成した画像に変更します。
タイルに表示させる画像
以下の3つの画像を準備します。ファイル名にも注意してください。"(ファイル名).scale-(サイズ).png"の形式になります。
prof.scale-80.png
120×120 Pixel

prof.scale-100.png
150×150 Pixel

prof.scale-140.png
210×210 Pixel

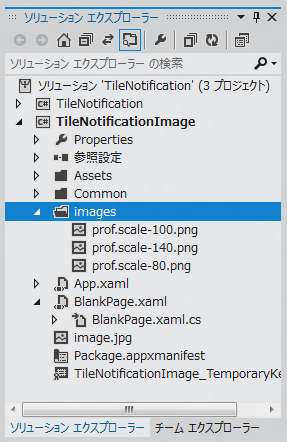
プロジェクトのルートに"images"ディレクトリを作成し、作成した画像を"images"ディレクトリ内に配置します。(下図参照)
コード
以下のコードを記述します。実質はButtonのClickイベントハンドラを記述するのみです。
using System;
using System.Collections.Generic;
using System.IO;
using System.Linq;
using Windows.Foundation;
using Windows.Foundation.Collections;
using Windows.UI.Xaml;
using Windows.UI.Xaml.Controls;
using Windows.UI.Xaml.Controls.Primitives;
using Windows.UI.Xaml.Data;
using Windows.UI.Xaml.Input;
using Windows.UI.Xaml.Media;
using Windows.UI.Xaml.Navigation;
using Windows.Data.Xml.Dom;
using Windows.UI.Notifications;

// The Blank Page item template is documented at http://go.microsoft.com/fwlink/?LinkId=234238

namespace TileNotificationImage
{
  /// <summary>
  /// An empty page that can be used on its own or navigated to within a Frame.
  /// </summary>
  public sealed partial class BlankPage : Page
  {
    public BlankPage()
    {
      this.InitializeComponent();
    }

    /// <summary>
    /// Invoked when this page is about to be displayed in a Frame.
    /// </summary>
    /// <param name="e">Event data that describes how this page was reached.  The Parameter
    /// property is typically used to configure the page.</param>
    protected override void OnNavigatedTo(NavigationEventArgs e)
    {
    }

    private void Button_Click_1(object sender, RoutedEventArgs e)
    {
      XmlDocument content = new XmlDocument();

      string doc = "<title><visual version=\"1\" lang=\"en-US\">"
        + "<binding template=\"TileSquareImage\">"
        + "<image id=\"1\" src=\"ms-appx:///images/prof.png\"/>"
        + "</binding>"
        + "</visual></title>";
      content.LoadXml(doc);
      Windows.UI.Notifications.TileNotification tileNotification
        = new Windows.UI.Notifications.TileNotification(content);

      TileUpdater tileUpdater = TileUpdateManager.CreateTileUpdaterForApplication();
      tileUpdater.Update(tileNotification);
    }
  }
}
解説
タイルにメッセージを表示する処理と同様の処理を実行します。(詳細は
こちら)
タイルへメッセージを表示する方法と処理が似ています。違いは、タイル更新のXMLとXML内のtemplate属性の値が異なります。
ローカルのイメージを参照するため、imageタグ内のsrc属性は
ms-appx:///images/prof.png
と記述します。
実際に作成してimagesディレクトリに配置したファイルは
- prof.scale-80.png
- prof.scale-100.png
- prof.scale-140.png
の3ファイルですが、URIの指定は"/images/prof.png"となることに注意してください。
アプリケーション実行結果
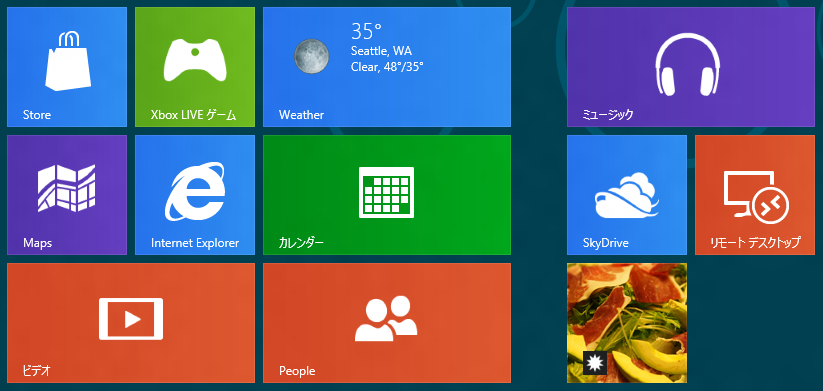
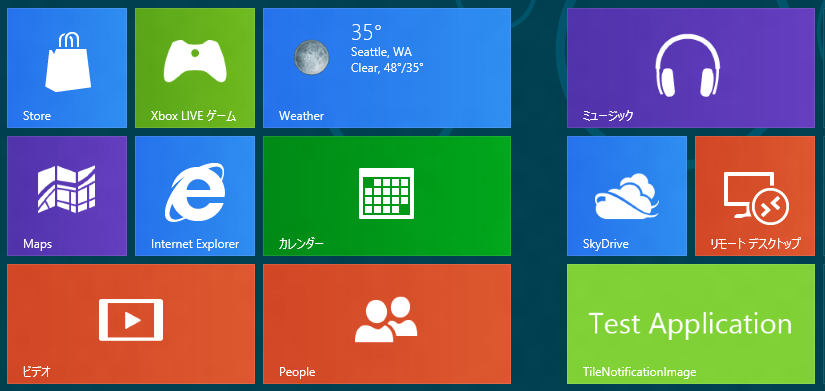
アプリケーションを実行し、ボタンを押します。
タイルに画像が表示されました。(右下のタイル)
タイルを右クリックし、下部の[大きくする]メニューを選択しタイルをワイドサイズに変えてみます。ワイドサイズのタイルには画像が表示されていません。ワイドサイズのタイルに画像を表示する方法は
こちらの記事を参照してください。
著者
iPentecのメインプログラマー
C#, ASP.NET の開発がメイン、少し前まではDelphiを愛用
最終更新日: 2024-01-06
作成日: 2012-03-19
