アプリケーション起動時のウィンドウサイズを設定するコードを紹介します。
概要
WinUI 3 アプリケーションのプロジェクトを作成し実行すると、デフォルトではメインウィンドウはスクリーンサイズに応じたサイズで表示されます。
小さいウィンドウでよいアプリケーションを作成したい場合、デフォルトのサイズではウィンドウが大きすぎるため、
アプリケーション起動時にウィンドウサイズを指定したいです。
この記事では、アプリケーション起動時のウィンドウサイズを設定するコードを紹介します。
実装の方針
WinUI 3アプリケーション(Windows App SDK)では、AppWindow オブジェクトを利用してウィンドウの設定を変更できます。
アプリケーション起動時に、AppWindowオブジェクトを取得し、Resize() メソッドを呼び出して、起動時のウィンドウサイズを指定します。
プログラム
WinUI 3アプリケーションを作成します。
コード
以下のコードを記述します。
<Window
    x:Class="WindowSizeSet.MainWindow"
    xmlns="http://schemas.microsoft.com/winfx/2006/xaml/presentation"
    xmlns:x="http://schemas.microsoft.com/winfx/2006/xaml"
    xmlns:local="using:WindowSizeSet"
    xmlns:d="http://schemas.microsoft.com/expression/blend/2008"
    xmlns:mc="http://schemas.openxmlformats.org/markup-compatibility/2006"
    mc:Ignorable="d">

    <StackPanel Orientation="Horizontal" HorizontalAlignment="Center" VerticalAlignment="Center">
        <Button x:Name="myButton" Click="myButton_Click">Click Me</Button>
    </StackPanel>
</Window>
using Microsoft.UI.Xaml;
using Microsoft.UI.Xaml.Controls;
using Microsoft.UI.Xaml.Controls.Primitives;
using Microsoft.UI.Xaml.Data;
using Microsoft.UI.Xaml.Input;
using Microsoft.UI.Xaml.Media;
using Microsoft.UI.Xaml.Navigation;
using System;
using System.Collections.Generic;
using System.IO;
using System.Linq;
using System.Runtime.InteropServices.WindowsRuntime;
using Windows.Foundation;
using Windows.Foundation.Collections;

// To learn more about WinUI, the WinUI project structure,
// and more about our project templates, see: http://aka.ms/winui-project-info.

namespace WindowSizeSet
{
  /// <summary>
  /// An empty window that can be used on its own or navigated to within a Frame.
  /// </summary>
  public sealed partial class MainWindow : Window
  {
    public MainWindow()
    {
      this.InitializeComponent();

      IntPtr hwnd = WinRT.Interop.WindowNative.GetWindowHandle(this);
      Microsoft.UI.WindowId windowId = Microsoft.UI.Win32Interop.GetWindowIdFromWindow(hwnd);
      Microsoft.UI.Windowing.AppWindow appWindow = Microsoft.UI.Windowing.AppWindow.GetFromWindowId(windowId);

      appWindow.Resize(new Windows.Graphics.SizeInt32(320,200));
    }

    private void myButton_Click(object sender, RoutedEventArgs e)
    {
      myButton.Content = "Clicked";
    }
  }
}
解説
ウィンドウクラスのコンストラクタに以下のコードを追加します。
最初の3行はAppWindowオブジェクト(Microsoft.UI.Windowing.AppWindow)を取得するコードです。
ウィンドウハンドルを取得し、ウィンドウハンドルからウィンドウIDを取得し、ウィンドウIDからAppWindowオブジェクトを取得します。
取得したAppWindowオブジェクトの Resize() メソッドを呼び出してウィンドウのサイズを設定します。
今回の例では、ウィンドウの幅を320px、高さを200pxに設定します。
  IntPtr hwnd = WinRT.Interop.WindowNative.GetWindowHandle(this);
  Microsoft.UI.WindowId windowId = Microsoft.UI.Win32Interop.GetWindowIdFromWindow(hwnd);
  Microsoft.UI.Windowing.AppWindow appWindow = Microsoft.UI.Windowing.AppWindow.GetFromWindowId(windowId);

  appWindow.Resize(new Windows.Graphics.SizeInt32(320,200));
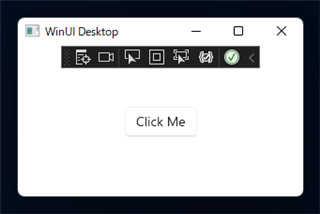
実行結果
プロジェクトを実行します。下図のメインウィンドウが表示されます。
ウィンドウサイズの幅が320px、高さが200pxで表示され、デフォルトのウィンドウサイズより小さいウィンドウが表示されます。
著者
iPentecのメインプログラマー
C#, ASP.NET の開発がメイン、少し前まではDelphiを愛用
最終更新日: 2022-08-11
作成日: 2022-08-10
