コントロールの外観をビットマップにコピーするコードを紹介します。
UI
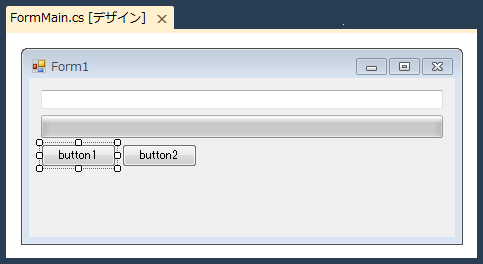
以下のUIを作成します。
コード
using System;
using System.Collections.Generic;
using System.ComponentModel;
using System.Data;
using System.Drawing;
using System.Linq;
using System.Text;
using System.Windows.Forms;

namespace ControlCapt
{
  public partial class FormMain : Form
  {
    public FormMain()
    {
      InitializeComponent();
    }

    private void button1_Click(object sender, EventArgs e)
    {
      Bitmap bmp = new Bitmap(this.Width, this.Height);
      this.DrawToBitmap(bmp, new Rectangle(0,0,this.Width,this.Height));
      bmp.Save("capture.bmp");
    }

    private void button2_Click(object sender, EventArgs e)
    {
      Bitmap bmp = new Bitmap(textBox1.Width, textBox1.Height);
      textBox1.DrawToBitmap(bmp, new Rectangle(0, 0, textBox1.Width, textBox1.Height));
      bmp.Save("capture.bmp");
    }
  }
}
解説
Button1
Bitmap bmp = new Bitmap(this.Width, this.Height);
this.DrawToBitmap(bmp, new Rectangle(0,0,this.Width,this.Height));
bmp.Save("capture.bmp");
ビットマップを作成します。ビットマップのサイズはキャプチャを取得するフォームの幅と高さにします。ビットマップ作成後、フォームのDrawToBitmapメソッドを呼び出しフォームの描画イメージをビットマップに描画します。描画範囲はフォームの幅と高さの範囲とします。画像描画後ビットマップのSaveメソッドを呼び出しファイルに保存します。
Button2
Bitmap bmp = new Bitmap(textBox1.Width, textBox1.Height);
textBox1.DrawToBitmap(bmp, new Rectangle(0, 0, textBox1.Width, textBox1.Height));
bmp.Save("capture.bmp");
Button2もButton1と同様の手順でビットマップを保存します。違いはフォームのDrawToBitmapではなく、textBox1のDrawToBitmapを呼び出す点です。ビットマップのサイズや描画範囲もtextBox1の幅と高さにします。
実行結果
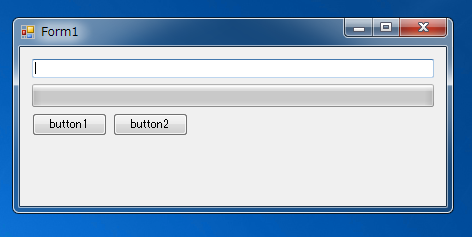
アプリケーションを実行します。下図のフォームが表示されます。
テキストボックスに文字を入力します。入力後Button1またはButton2をクリックします。
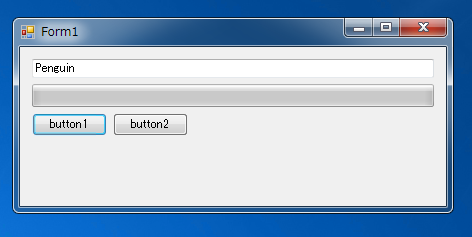
Button1をクリックすると実行ファイルと同じディレクトリに"capture.bmp"ファイルが作成されます。ファイルの画像は下図になります。フォーム全体のキャプチャー画像が保存されています。
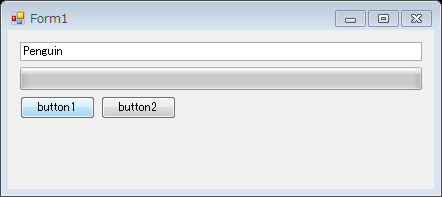
Button2をクリックした場合も実行ファイルと同じディレクトリに"capture.bmp"が作成されます。ファイルの画像は下図になります。テキストボックスのキャプチャー画像が保存されています。

著者
iPentecのメインプログラマー
C#, ASP.NET の開発がメイン、少し前まではDelphiを愛用
最終更新日: 2024-01-06
作成日: 2012-04-30
