AndroidのSQLiteでSQLパラメータを利用する方法を紹介します。
コード
package iPentec.SimpleSqlite2;

import android.app.Activity;
import android.content.Context;
import android.database.sqlite.SQLiteDatabase;
import android.database.sqlite.SQLiteOpenHelper;
import android.os.Bundle;
import android.database.Cursor;
import android.database.sqlite.SQLiteDatabase;
import android.database.sqlite.SQLiteOpenHelper;
import android.database.sqlite.SQLiteStatement;
import android.view.View;
import android.widget.TextView;

public class SimpleSqlite2 extends Activity {
  /** Called when the activity is first created. */
  @Override
  public void onCreate(Bundle savedInstanceState) {
    super.onCreate(savedInstanceState);
    setContentView(R.layout.main);

    MyDBHelper helper = new MyDBHelper(this);
    SQLiteDatabase db = helper.getReadableDatabase();

    Cursor c = db.query("products",
        new String[] { "code", "name", "price" }, null, null, null,
        null, null);
    c.moveToFirst();

    CharSequence[] list = new CharSequence[c.getCount()];
    for (int i = 0; i < list.length; i++) {
      list[i] = c.getString(0) + " - " + c.getString(1) + " - "
          + c.getString(2);
      c.moveToNext();
    }
    c.close();

    String text = "";
    for (int i = 0; i < list.length; i++) {
      text += list[i] + "\r\n";
    }

    TextView textView1 = (TextView) findViewById(R.id.textView1);
    // String text="Penguin";
    textView1.setText(text);
  }

  public class MyDBHelper extends SQLiteOpenHelper {
    public MyDBHelper(Context context) {
      super(context, null, null, 1);
    }

    @Override
    public void onUpgrade(SQLiteDatabase db, int oldVersion, int newVersion) {
      // TODO Auto-generated method stub
    }

    @Override
    public void onCreate(SQLiteDatabase db) {
      // TODO Auto-generated method stub
      db.beginTransaction();
      try {
        db.execSQL("create table products (code text primary key, name text, price float);");

        String[] code = { "CD-0100", "CD-0101", "CD-0102" };
        String[] name = { "Cookie", "Candy", "Cake" };
        float[] price = { 150f, 80.5f, 360f };

        SQLiteStatement stmt = db.compileStatement(
          "insert into products(code,name,price) values (?, ?, ?);");

        for (int i = 0; i < name.length; i++) {
          stmt.bindString(1, code[i]);
          stmt.bindString(2, name[i]);
          stmt.bindString(3, String.valueOf(price[i]));
          stmt.executeInsert();
        }
        db.setTransactionSuccessful();
      } finally {
        db.endTransaction();
      }
    }
  }
}
解説
下記がSQLパラメーターの定義部になります。SQLiteでは"?"を記述することでSQLパラメータと認識されます。
SQLiteStatement stmt = db.compileStatement("insert into products(code,name,price) values (?, ?, ?);");
下記がSQLパラメーターの代入部分になります。最初の"?"パラメーターから順番にインデックスが1,2,3となっています。
for (int i = 0; i < name.length; i++) {
  stmt.bindString(1, code[i]);
  stmt.bindString(2, name[i]);
  stmt.bindString(3, String.valueOf(price[i]));
  stmt.executeInsert();
}
上記の例ではi=0の場合、以下のSQLが生成され実行されます。
insert into products(code,name,price) values ('CD-0100', 'Cookie', 150);
コード
<?xml version="1.0" encoding="utf-8"?>
<LinearLayout xmlns:android="http://schemas.android.com/apk/res/android"
    android:orientation="vertical"
    android:layout_width="fill_parent"
    android:layout_height="fill_parent"
    >
<TextView
    android:layout_width="fill_parent"
    android:layout_height="wrap_content"
    android:text="@string/hello"
    />
<TextView android:text="TextView" android:id="@+id/textView1" android:layout_width="wrap_content" android:layout_height="wrap_content"></TextView>
</LinearLayout>
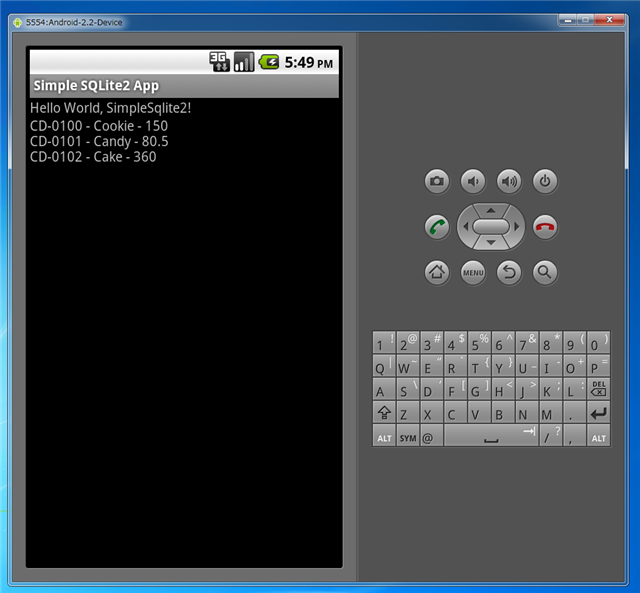
実行結果
プロジェクトを実行すると以下の実行結果となります。
著者
iPentecのプログラマー、最近はAIの積極的な活用にも取り組み中。
とっても恥ずかしがり。
最終更新日: 2024-01-04
作成日: 2011-03-12
