こちらの記事では、AndroidでSQLiteを使ったシンプルなアプリケーションを紹介しました。このシンプルなアプリケーションは、SQLiteのデータベースをメモリ上に作成するため、電源をOFFにしたり、アプリケーションを終了するとデータベースに保存された内容は失われます。
この記事では、SQLiteのデータベースファイルをファイルに保存する方法を紹介します。
2013年3月版
プロジェクトの設定
- Project name: SimpleSqlite2
- Build Target: Android 2.3
- Application name: SimpleSqlite2
- Package name: com.iPentec.SimpleSqlite2
- Activity: MainActivity
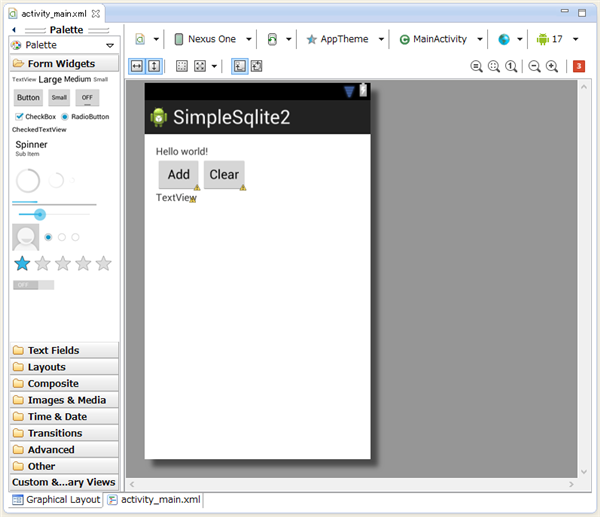
UI
プロジェクトの作成後 /res/layout/activity_main.xml を開きデザイナ画面でUIを作成します。
今回はButtonを2つ、TextViewを1つ追加します。
Addボタンが"Button1"、"Clear"ボタンがButton2になります。
activity_main.xml
画面のレイアウトXMLは下記です。
<RelativeLayout xmlns:android="http://schemas.android.com/apk/res/android"
    xmlns:tools="http://schemas.android.com/tools"
    android:layout_width="match_parent"
    android:layout_height="match_parent"
    android:paddingBottom="@dimen/activity_vertical_margin"
    android:paddingLeft="@dimen/activity_horizontal_margin"
    android:paddingRight="@dimen/activity_horizontal_margin"
    android:paddingTop="@dimen/activity_vertical_margin"
    tools:context=".MainActivity" >

    <TextView
        android:id="@+id/textView1"
        android:layout_width="wrap_content"
        android:layout_height="wrap_content"
        android:text="@string/hello_world" />

    <Button
        android:id="@+id/button1"
        android:layout_width="wrap_content"
        android:layout_height="wrap_content"
        android:layout_alignLeft="@+id/textView1"
        android:layout_below="@+id/textView1"
        android:onClick="Button1_click"
        android:text="Add" />

    <Button
        android:id="@+id/button2"
        android:layout_width="wrap_content"
        android:layout_height="wrap_content"
        android:layout_below="@+id/textView1"
        android:layout_toRightOf="@+id/button1"
        android:onClick="Button2_click"
        android:text="Clear" />

    <TextView
        android:id="@+id/textView2"
        android:layout_width="wrap_content"
        android:layout_height="wrap_content"
        android:layout_alignLeft="@+id/button1"
        android:layout_below="@+id/button1"
        android:text="TextView" />
</RelativeLayout>
コード
下記のコードを記述します。
MainActivity.java
package com.iPentec.simplesqlite2;

import com.iPentec.simplesqlite2.MyDBHelper;
import com.iPentec.simplesqlite2.R;
import android.os.Bundle;
import android.app.Activity;
import android.database.Cursor;
import android.database.sqlite.SQLiteDatabase;
import android.view.Menu;
import android.view.*;
import android.widget.TextView;
import android.content.*;
import android.widget.Toast;

public class MainActivity extends Activity {

  @Override
  protected void onCreate(Bundle savedInstanceState) {
    super.onCreate(savedInstanceState);
    setContentView(R.layout.activity_main);

    MyDBHelper helper = new MyDBHelper(this);
    SQLiteDatabase db = helper.getReadableDatabase();

    // データ取り出し
    String text = "";
    Cursor c = db.query("products", new String[] { "name", "price" }, null,
        null, null, null, null);
    boolean isEof = c.moveToFirst();
    while (isEof) {
      text += String.format("%s : %d円\r\n", c.getString(0), c.getInt(1));
      isEof = c.moveToNext();
    }
    TextView textView2 = (TextView) findViewById(R.id.textView2);
    textView2.setText(text);}

  @Override
  public boolean onCreateOptionsMenu(Menu menu) {
    // Inflate the menu; this adds items to the action bar if it is present.
    getMenuInflater().inflate(R.menu.main, menu);
    return true;
  }

  public void Button1_click(View view){
    MyDBHelper helper = new MyDBHelper(this);
    SQLiteDatabase db = helper.getReadableDatabase();

    // データ挿入
    db.execSQL("insert into products(name,price) values ('Pig', 250);");
    db.execSQL("insert into products(name,price) values ('Penguin', 120);");
    db.execSQL("insert into products(name,price) values ('Camel', 520);");
    db.execSQL("insert into products(name,price) values ('Hawk', 60);");

    Context cx = getApplicationContext();
    Toast ts = Toast.makeText(cx, "データを挿入しました。", Toast.LENGTH_LONG);
    ts.show();
  }

  public void Button2_click(View view){
    MyDBHelper helper = new MyDBHelper(this);
    SQLiteDatabase db = helper.getReadableDatabase();
    // データクリア
    db.execSQL("delete from products");

    Context cx = getApplicationContext();
    Toast ts = Toast.makeText(cx, "データを削除しました。", Toast.LENGTH_LONG);
    ts.show();
    }
}
解説
基本は
こちらのコードと同様です。Addボタンが押された場合はSQLiteにレコードを挿入し、Clearボタンが押された場合はレコードをすべて削除する動作になっています。
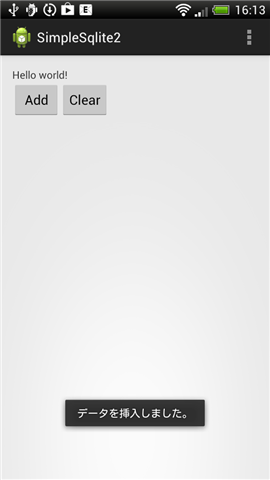
実行結果
プロジェクトを実行します。
最初の起動時には下図の画面が表示されます。

[Add]ボタンを押します。"データを挿入しました。"のトーストが表示されます。
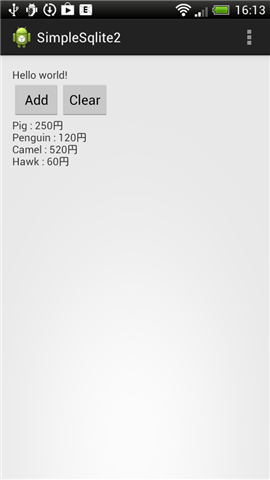
一度アプリを終了し、再度アプリを起動します。下図の画面が表示されます。データが挿入されたことが確認できます。アプリケーションが終了してもデータが保存されていることも確認できます。
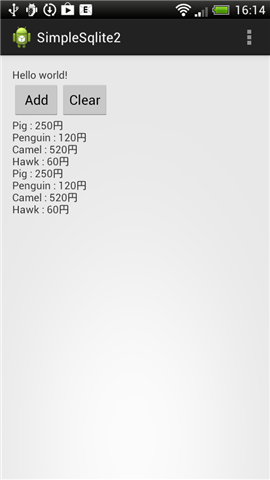
もう一度[Add]ボタンを押します。"データを挿入しました。"のトーストが表示されます。
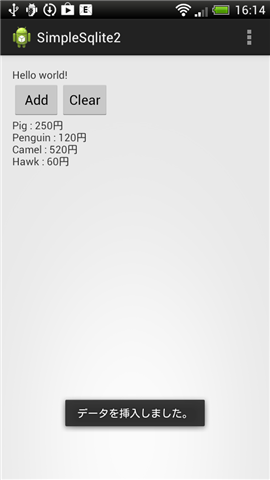
一度アプリを終了し、再度アプリを起動します。下図の画面が表示されます。レコードの件数が増えていることが確認できます。既存のデータに追加されたことがわかります。
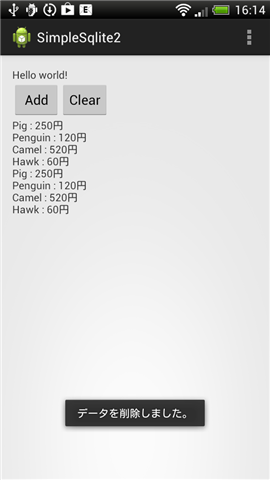
[Clear]ボタンを押します。"データを削除しました。"のトーストが表示されます。
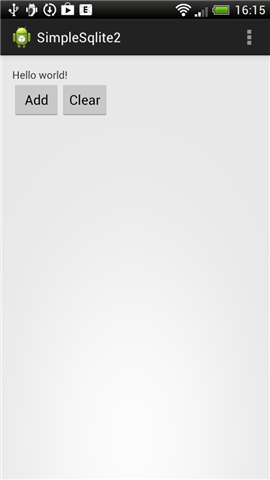
アプリケーションを終了し、再度起動します。下図の画面が表示されます。画面の表示がなくなり、レコードが削除されたことが確認できます。
古い版
コード
こちらの記事のコードをそのまま用います。SimpleSQLite.javaを以下のコードに置き換えます。
コード (SimpleSQLite.java)
package iPentec.SimpleSqlite;

import android.app.Activity;
import android.os.Bundle;
import android.database.Cursor;
import android.database.sqlite.SQLiteDatabase;
import android.database.sqlite.SQLiteOpenHelper;
import android.database.sqlite.SQLiteStatement;
import android.content.Context;
import android.view.View;
import android.widget.TextView;

public class SimpleSQLite extends Activity {
	/** Called when the activity is first created. */

	@Override
	public void onCreate(Bundle savedInstanceState) {
		super.onCreate(savedInstanceState);
		setContentView(R.layout.main);

		MyDBHelper helper = new MyDBHelper(this);
		SQLiteDatabase db = helper.getReadableDatabase();

		Cursor c = db.query("products", new String[] { "name", "price" },
				null, null, null, null, null);

		boolean isEof = c.moveToFirst();
		TextView textView1 = (TextView)findViewById(R.id.textView1);
		String text="";
		while (isEof) {
			text += String.format("%s : %d円\r\n", c.getString(0), c.getInt(1));
			isEof = c.moveToNext();
			//layout.addView(tv);
		}
		textView1.setText(text);
		c.close();
		db.close();
	}

	@Override
	protected void onDestroy() {
		super.onDestroy();
	}

	public class MyDBHelper extends SQLiteOpenHelper {
		public MyDBHelper(Context context) {
			super(context, "mydb.dat", null, 1);
		}

		@Override
		public void onUpgrade(SQLiteDatabase db, int oldVersion, int newVersion) {
			// TODO Auto-generated method stub
		}

		@Override
		public void onCreate(SQLiteDatabase db) {
			// table create
			db.execSQL(
				"create table products("+
				"	name text not null,"+
				"	price text"+
				");"
			);

			// table row insert
			db.execSQL("insert into products(name,price) values ('Cookie', 120);");
			db.execSQL("insert into products(name,price) values ('Candy', 85);");
			db.execSQL("insert into products(name,price) values ('Cake', 285);");
		}
	}
}
解説
変更点は以下の部分だけです。
public class MyDBHelper extends SQLiteOpenHelper {
public MyDBHelper(Context context) {
super(context, "mydb.dat", null, 1);
}
...
}
元のコードではDBHelperクラスの基底クラスのコンストラクタ呼び出しのsuperの第二引数がnullでしたが、ここに文字列を与えると与えた文字列をファイル名としてデータベースをファイルにして保存します。ファイルの保存位置は
/data/data/(パッケージ名)/database/
ディレクトリに保存されます。
著者
iPentecのプログラマー、最近はAIの積極的な活用にも取り組み中。
とっても恥ずかしがり。
最終更新日: 2024-01-04
作成日: 2011-07-07
