タスクバーのポップアップメニューにタスクカテゴリのメニューを追加します。
事前準備
Windows API Code Pack 1.1を導入します。詳細は
こちらの記事を参照してください。
Windows API Code Pack 1.1のbinariesディレクトリにあるアセンブリを参照します。アセンブリは下図の5種があります。

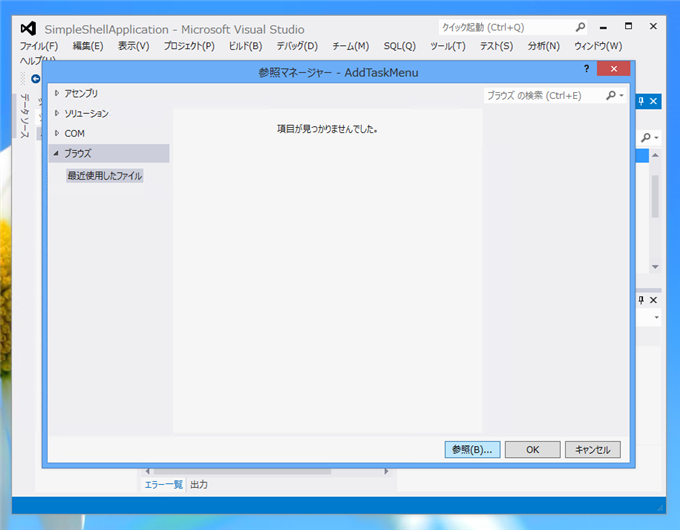
Visual Studio のソリューションエクスプローラの[参照設定]ノードを選択し右クリックしてポップアップメニューを表示します。メニューの[参照の追加]を選択します。

参照マネージャーダイアログボックスが表示されます。左側のメニューの[ブラウズ]を選択します。画面下部の[参照]ボタンを押します。
[参照するファイルの選択]ダイアログボックスが表示されます。Windows API Code Pack 1.1のアセンブリから"Microsoft.WinodwsAPICodePack.dll"と"Microsoft.WindowsAPICodePack.Shell.dll"を選択します。

参照マネージャーにアセンブリが追加されました。ダイアログ下部の[OK]ボタンを押します。
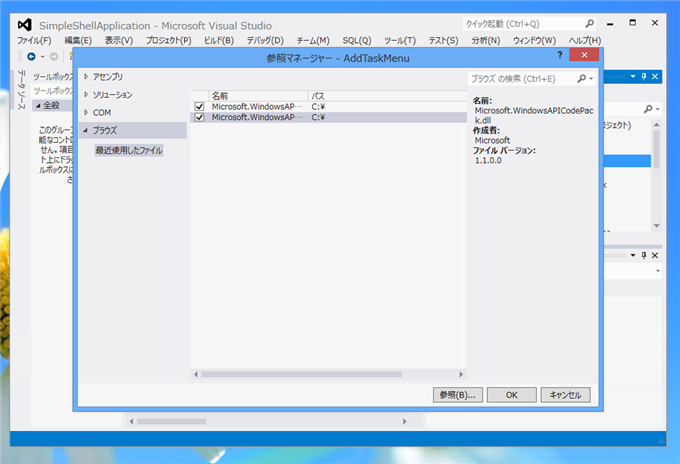
ソリューションエクスプローラの[参照設定]ノードに"Microsoft.WinodwsAPICodePack.dll"と"Microsoft.WindowsAPICodePack.Shell.dll"が追加されました。

プログラム例
UI
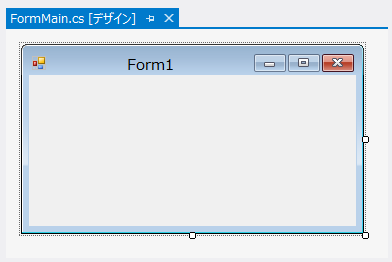
以下のUIを作成します。フォームを作成したのみです。
初期状態の実行結果
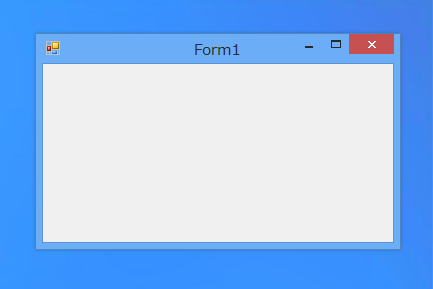
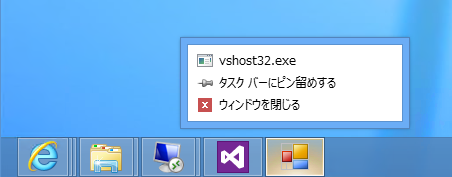
何もコードを記述せずに実行します。下図のフォームが表示されます。
タスクバーのアプリケーションアイコンを右クリックしタスクバーのメニューを表示します。下図のメニューが表示されます。
コード
下記のコードを記述します。
using System;
using System.Collections.Generic;
using System.ComponentModel;
using System.Data;
using System.Drawing;
using System.Linq;
using System.Text;
using System.Threading.Tasks;
using System.Windows.Forms;
using System.IO;
using Microsoft.WindowsAPICodePack.Shell;
using Microsoft.WindowsAPICodePack.Taskbar;

namespace AddTaskMenu
{
  public partial class FormMain : Form
  {
    private JumpList jumpList;

    public FormMain()
    {
      InitializeComponent();
    }

    private void FormMain_Shown(object sender, EventArgs e)
    {
      jumpList = JumpList.CreateJumpList();

      jumpList.AddUserTasks(new JumpListSeparator());

      string systemFolder = Environment.GetFolderPath(Environment.SpecialFolder.System);
      string path = Path.Combine(systemFolder, "calc.exe");
      JumpListLink jll = new JumpListLink(path, "電卓を開く");
      jll.IconReference = new IconReference(path, 0);

      /*
      //別の書式
       JumpListLink jll = new JumpListLink(Path.Combine(systemFolder, "calc.exe"), "電卓を開く"){
        IconReference = new IconReference(Path.Combine(systemFolder, "calc.exe"), 0);
      }
      */

      jumpList.AddUserTasks(jll);

      jumpList.Refresh();

    }
  }
}
解説
jumpList = JumpList.CreateJumpList();
にて、タスクメニューのジャンプリストを作成します。
jumpList.AddUserTasks(new JumpListSeparator());
セパレーターを挿入します。
string systemFolder = Environment.GetFolderPath(Environment.SpecialFolder.System);
string path = Path.Combine(systemFolder, "calc.exe");
JumpListLink jll = new JumpListLink(path, "電卓を開く");
タスクメニューに表示するタスク(メニュー要素)を作成します。最初の引数に実行するファイルのパス、2番目の引数にメニューに表示する文字列を与えます。
jll.IconReference = new IconReference(path , 0);
にて、タスクメニューに表示するアイコン画像を設定します。
jumpList.AddUserTasks(jll);
タスクメニューのジャンプリストにJumpListLinkの要素を追加します。
jumpList.Refresh();
JumpListのRefreshメソッドを呼び出すことで、タスクメニューの内容が更新されます。
実行結果
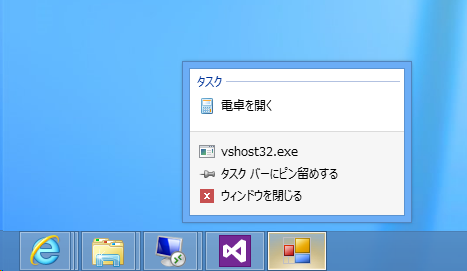
プロジェクトを実行し、タスクバーのアプリケーションアイコンで右クリックをしメニューを表示します。下図のメニューが表示され、[タスク]メニューに"電卓を開く"メニューが追加されました。
補足
タスクメニューを削除する場合
タスクメニューは一度登録するとアプリケーションを終了しても登録され続けたままになります。タスクメニューを削除する場合は下記コードのプログラムを実行します。
using System;
using System.Collections.Generic;
using System.ComponentModel;
using System.Data;
using System.Drawing;
using System.Linq;
using System.Text;
using System.Threading.Tasks;
using System.Windows.Forms;
using System.IO;
using Microsoft.WindowsAPICodePack.Shell;
using Microsoft.WindowsAPICodePack.Taskbar;

namespace AddTaskMenu
{
  public partial class FormMain : Form
  {
    private JumpList jumpList;

    public FormMain()
    {
      InitializeComponent();


    }

    private void Form1_Load(object sender, EventArgs e)
    {

    }

    private void FormMain_Shown(object sender, EventArgs e)
    {
      jumpList = JumpList.CreateJumpList();
      jumpList.ClearAllUserTasks();
      jumpList.Refresh();
    }
  }
}
セパレーターが無効な場合
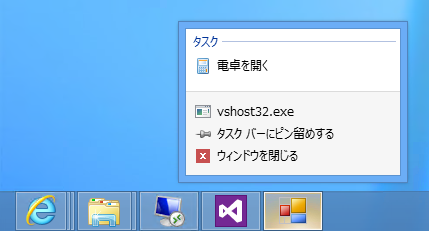
要素が一つしかない場合、FormMain_Shownメソッドがどちらの場合でも結果は同じになります。
セパレーターありの場合
private void FormMain_Shown(object sender, EventArgs e)
{
  jumpList = JumpList.CreateJumpList();
  jumpList.AddUserTasks(new JumpListSeparator()); //セパレーターあり

  string systemFolder = Environment.GetFolderPath(Environment.SpecialFolder.System);
  string path = Path.Combine(systemFolder, "calc.exe");
  JumpListLink jll = new JumpListLink(path, "電卓を開く");
  jll.IconReference = new IconReference(path, 0);
  jumpList.AddUserTasks(jll);
  jumpList.Refresh();
}
セパレーターなしの場合
private void FormMain_Shown(object sender, EventArgs e)
{
  jumpList = JumpList.CreateJumpList();

  string systemFolder = Environment.GetFolderPath(Environment.SpecialFolder.System);
  string path = Path.Combine(systemFolder, "calc.exe");
  JumpListLink jll = new JumpListLink(path, "電卓を開く");
  jll.IconReference = new IconReference(path, 0);
  jumpList.AddUserTasks(jll);
  jumpList.Refresh();
}
実行結果
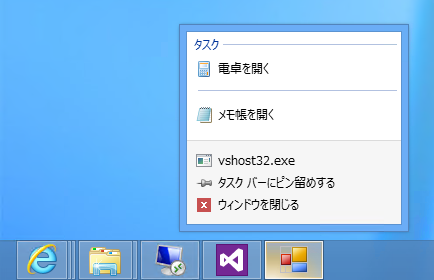
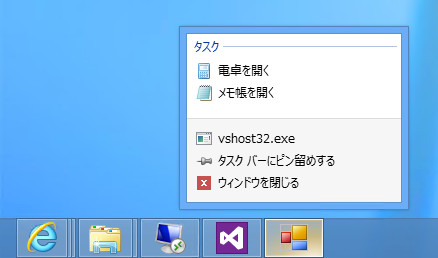
セパレーターが有効な場合
2つ以上の要素がある場合はセパレーターが機能します。
セパレータありの場合
private void FormMain_Shown(object sender, EventArgs e)
{
      jumpList = JumpList.CreateJumpList();
      string systemFolder = Environment.GetFolderPath(Environment.SpecialFolder.System);
      string path = Path.Combine(systemFolder, "calc.exe");
      JumpListLink jll = new JumpListLink(path, "電卓を開く");
      jll.IconReference = new IconReference(path, 0);
      jumpList.AddUserTasks(jll);

      jumpList.AddUserTasks(new JumpListSeparator());

      string path2 = Path.Combine(systemFolder, "notepad.exe");
      JumpListLink jll2 = new JumpListLink(path2, "メモ帳を開く");
      jll2.IconReference = new IconReference(path2, 0);
      jumpList.AddUserTasks(jll2);
      jumpList.Refresh();
}
実行結果
セパレータなしの場合
private void FormMain_Shown(object sender, EventArgs e)
{
      jumpList = JumpList.CreateJumpList();
      string systemFolder = Environment.GetFolderPath(Environment.SpecialFolder.System);
      string path = Path.Combine(systemFolder, "calc.exe");
      JumpListLink jll = new JumpListLink(path, "電卓を開く");
      jll.IconReference = new IconReference(path, 0);
      jumpList.AddUserTasks(jll);


      string path2 = Path.Combine(systemFolder, "notepad.exe");
      JumpListLink jll2 = new JumpListLink(path2, "メモ帳を開く");
      jll2.IconReference = new IconReference(path2, 0);
      jumpList.AddUserTasks(jll2);
      jumpList.Refresh();
}
実行結果
著者
iPentecのメインプログラマー
C#, ASP.NET の開発がメイン、少し前まではDelphiを愛用
最終更新日: 2018-02-19
作成日: 2012-08-24
