XMLレイアウトを用いてカメラプレビューを表示するコードを紹介します。
プロジェクトの作成
Android アプリケーションプロジェクトを作成します。
[New Android Application]ダイアログボックスが表示されますので、以下を設定します。
- Application Name: "SimpleCamera3Xml"
- Project Name: "SimpleCamera3Xml"
- Package Name: "com.ipentec.simplecamera3xml"
- Minimum Required SDK: "API 8: Android 2.2 (Froyo)"
- Target SDK: "API 17: Android 4.2 (Jelly Bean)"
- Compile With: "API 17: Android 4.2 (Jelly Bean)"
- Theme: "Holo Light with Dark Action Bar"
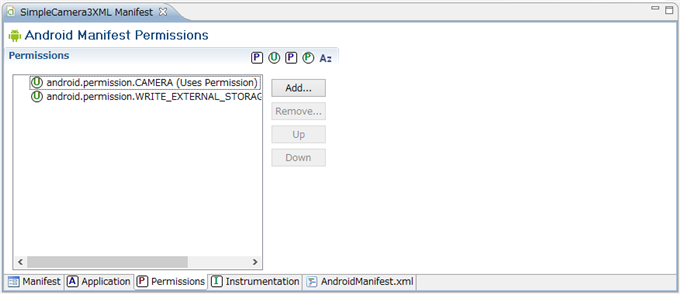
AndroidManifest
AndroidManifest.xmlファイルを開き、"android.permission.CAMERA", "android.permission.WRITE_EXTERNAL_STORAGE"を追加します。("android.permission.WRITE_EXTERNAL_STORAGE"はカメラで撮影した写真をSDカードに保存する場合に必要となります。)
UI
レイアウトXMLに以下のコードを記述します。
activity_main.xml
<RelativeLayout xmlns:android="http://schemas.android.com/apk/res/android"
    xmlns:tools="http://schemas.android.com/tools"
    android:layout_width="match_parent"
    android:layout_height="match_parent"
    android:paddingBottom="@dimen/activity_vertical_margin"
    android:paddingLeft="@dimen/activity_horizontal_margin"
    android:paddingRight="@dimen/activity_horizontal_margin"
    android:paddingTop="@dimen/activity_vertical_margin"
    tools:context=".MainActivity" >

    <TextView
        android:id="@+id/textView1"
        android:layout_width="wrap_content"
        android:layout_height="wrap_content"
        android:text="@string/hello_world" />

    <FrameLayout
        android:id="@+id/camera_preview"
        android:layout_width="fill_parent"
        android:layout_height="fill_parent"
        android:layout_below="@+id/textView1" />

</RelativeLayout>
解説
下記コードが追記部分です。
  <FrameLayout
    android:id="@+id/camera_preview"
    android:layout_width="fill_parent"
    android:layout_height="fill_parent"
    android:layout_weight="1" />
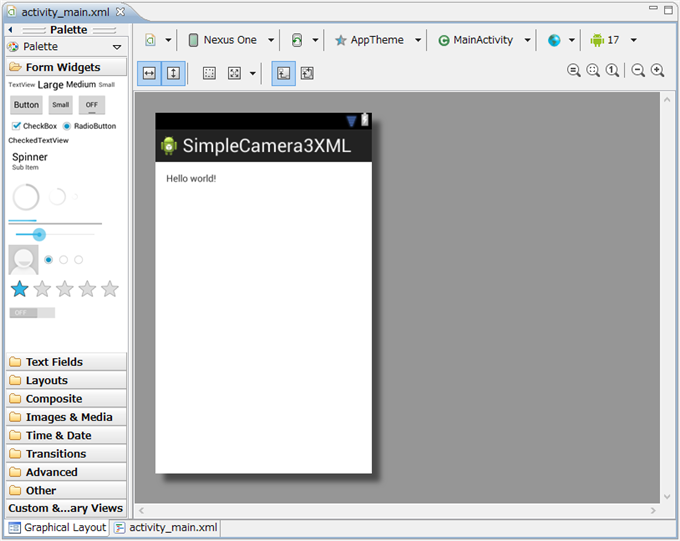
デザイナで確認すると下図の状態となります。
コード
以下のコードを記述します。
MainActivity.java
package com.iPentec.simplecamera3xml;

import android.hardware.Camera;
import android.os.Bundle;
import android.app.Activity;
import android.view.Menu;
import android.widget.FrameLayout;


public class MainActivity extends Activity {
  Camera mCamera;
  CameraPreview cameraPreview;
  FrameLayout preview;

  int numberOfCameras;
  int cameraCurrentlyLocked;
  int defaultCameraId;

  @Override
  protected void onCreate(Bundle savedInstanceState) {
    super.onCreate(savedInstanceState);
    setContentView(R.layout.activity_main);

    cameraPreview = new CameraPreview(this, null);
    preview = (FrameLayout) findViewById(R.id.camera_preview);
    preview.addView(cameraPreview);
  }

  @Override
  public boolean onCreateOptionsMenu(Menu menu) {
    // Inflate the menu; this adds items to the action bar if it is present.
    getMenuInflater().inflate(R.menu.main, menu);
    return true;
  }

  @Override
  protected void onResume() {
    super.onResume();

    if (cameraPreview != null){
      mCamera = Camera.open();
      cameraPreview.SetCamera(mCamera);
    }
  }

  @Override
  protected void onPause() {
      super.onPause();

      if (mCamera != null) {
        cameraPreview.SetCamera(null);
        //preview.setCamera(null);
        mCamera.release();
        mCamera = null;
      }
  }
}
解説
onCreate
  cameraPreview = new CameraPreview(this, null);
  preview = (FrameLayout) findViewById(R.id.camera_preview);
  preview.addView(cameraPreview);
SurfaceViewクラスのカスタムクラスであるcameraPreviewクラスのインスタンスを作成し、FrameLayoutのaddViewを呼び出してcameraPreviewオブジェクトを追加します。
補足
下記のコードのように実装しても動作はしますが、アプリの切り替えなどをするとアプリが不正終了する場合があります。アプリの切り替え時や復帰時にはonPause,onResumeメソッドが呼び出されるため、その中でカメラデバイスのオープンやクローズをする必要があります。
(アプリがバックグラウンドに回る際にはonPauseメソッドが呼び出されるため、そこでカメラデバイスを開放する、アプリの復帰時にはonResumeメソッドが呼び出されるため、カメラデバイスを開く操作をする必要があります。)
package com.iPentec.simplecamera3xml;

import android.hardware.Camera;
import android.os.Bundle;
import android.app.Activity;
import android.view.Menu;
import android.widget.FrameLayout;


public class MainActivity extends Activity {
  Camera mCamera;
  CameraPreview cameraPreview;
  FrameLayout preview;

  int numberOfCameras;
  int cameraCurrentlyLocked;
  int defaultCameraId;

  @Override
  protected void onCreate(Bundle savedInstanceState) {
    super.onCreate(savedInstanceState);
    setContentView(R.layout.activity_main);

    mCamera = Camera.open();
    cameraPreview = new CameraPreview(this, mCamera );
    preview = (FrameLayout) findViewById(R.id.camera_preview);
    preview.addView(cameraPreview);
  }

  @Override
  public boolean onCreateOptionsMenu(Menu menu) {
    // Inflate the menu; this adds items to the action bar if it is present.
    getMenuInflater().inflate(R.menu.main, menu);
    return true;
  }

  @Override
  protected void onResume() {
    super.onResume();
  }

  @Override
  protected void onPause() {
      super.onPause();
  }
}
onResume
  if (cameraPreview != null){
    mCamera = Camera.open();
    cameraPreview.SetCamera(mCamera);
  }
Cameraクラスのopen()メソッドを呼出しカメラデバイスを開きます。Cameraオブジェクトを取得し、SurfaceViewであるCameraPreviewにカメラオブジェクトを設定します。
onPause
  if (mCamera != null) {
    cameraPreview.SetCamera(null);
    mCamera.release();
    mCamera = null;
  }
Cameraオブジェクトが有効の場合、すなわちカメラデバイスが開かれている場合、SurfaceViewであるCameraPreviewに設定されているカメラオブジェクトをnullにしてクリアします。カメラオブジェクトの割り当てを解除したのち、Cameraオブジェクトのrelease()メソッドを呼び出しカメラデバイスを閉じます。
CameraPreview.java
package com.iPentec.simplecamera3xml;

import java.io.IOException;
import java.util.List;

import android.content.Context;
import android.hardware.Camera;
import android.hardware.Camera.Size;
import android.util.Log;
import android.view.SurfaceHolder;
import android.view.SurfaceView;

public class CameraPreview extends SurfaceView implements SurfaceHolder.Callback {
  private static final String TAG = "CameraPreview";
  private SurfaceHolder holder;
  private Camera camera;

  public CameraPreview(Context context, Camera camera) {
    super(context);
    this.camera = camera;

    // Initiate the Surface Holder properly
    holder = getHolder();
    this.holder.addCallback(this);
    this.holder.setType(SurfaceHolder.SURFACE_TYPE_PUSH_BUFFERS);
  }

  public void SetCamera(Camera camera){
    this.camera = camera;
  }

  @Override
  public void surfaceCreated(SurfaceHolder holder) {
    try {
        // open camera in preview mode
        camera.setPreviewDisplay(holder);
        camera.startPreview();
    } catch (IOException e) {
        Log.d(TAG, "Error setting camera preview:" + e.getMessage());
    }
  }

  @Override
  public void surfaceChanged(SurfaceHolder holder, int format, int width, int height) {
    Camera.Parameters parameters = camera.getParameters();
    List<Size> sizes = parameters.getSupportedPreviewSizes();
    Size optimalSize = getOptimalPreviewSize(sizes, width, height);
    parameters.setPreviewSize(optimalSize.width, optimalSize.height);
    camera.setParameters(parameters);
    camera.startPreview();
  }

  @Override
  public void surfaceDestroyed(SurfaceHolder holder) {
    if (camera != null){
      camera.stopPreview();
      camera.release();
      camera = null;
    }
  }

  private Size getOptimalPreviewSize(List<Size> sizes, int w, int h) {
    final double ASPECT_TOLERANCE = 0.1;
    double targetRatio = (double) w / h;
    if (sizes == null) return null;

    Size optimalSize = null;
    double minDiff = Double.MAX_VALUE;

    int targetHeight = h;

    // Try to find an size match aspect ratio and size
    for (Size size : sizes) {
      double ratio = (double) size.width / size.height;
      if (Math.abs(ratio - targetRatio) > ASPECT_TOLERANCE) continue;
      if (Math.abs(size.height - targetHeight) < minDiff) {
        optimalSize = size;
        minDiff = Math.abs(size.height - targetHeight);
      }
    }

    // Cannot find the one match the aspect ratio, ignore the requirement
    if (optimalSize == null) {
      minDiff = Double.MAX_VALUE;
      for (Size size : sizes) {
        if (Math.abs(size.height - targetHeight) < minDiff) {
          optimalSize = size;
          minDiff = Math.abs(size.height - targetHeight);
        }
      }
    }
    return optimalSize;
  }
}
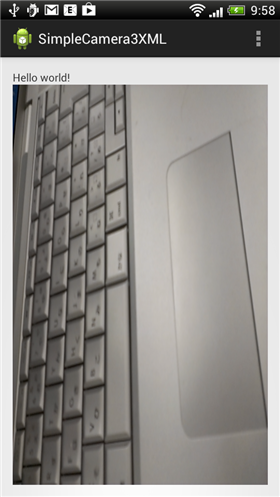
実行結果
プロジェクトを実行すると下図の画面が表示されます。タイトルバーやHelloWorldのTextViewが画面に表示されていることが確認できます。
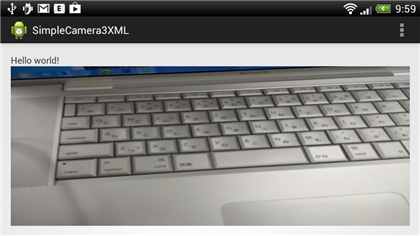
画面を回転させた状態です。
著者
iPentecのプログラマー、最近はAIの積極的な活用にも取り組み中。
とっても恥ずかしがり。
最終更新日: 2024-01-04
作成日: 2013-04-18
